Deploy the Kanban App
Throughout this tutorial, we have been running npx convex dev, which syncs our functions to a development deployment. That works well while you are building and testing. When you want other people to use the app, you need a production deployment.
Dev vs Production
Convex gives every project two deployments:
- Development — the one you have been using.
npx convex devwatches for file changes and pushes them instantly. Great for iteration, but not meant for real users. - Production — a stable deployment that only updates when you explicitly deploy to it. This is what your users will connect to.
Each deployment has its own database and its own URL. Data you created during development will not appear in production. They are completely separate environments.
Deploy Convex to Production
To deploy your backend functions and schema to production, run:
npx convex deploy
The first time, Convex will ask you to confirm the production deployment. After that, it pushes your convex/ directory to the production server.
This command also prints your production URL. It looks something like:
https://your-project.convex.cloud
You will need this URL for the frontend build.
The --cmd Flag
npx convex deploy accepts a --cmd flag that runs a shell command after deploying the backend. Convex sets the production URL as VITE_CONVEX_URL before running your command, so your frontend build automatically picks up the correct URL.
This means you can deploy the backend and build the frontend in a single step:
npx convex deploy --cmd 'pnpm run build'
This does two things in sequence:
- Deploys your Convex functions and schema to production
- Runs
pnpm run buildwithVITE_CONVEX_URLpointing to the production deployment
The result is a dist/ folder containing your built frontend, configured to talk to the production Convex backend.
Get a Deploy Key
Automated deployments (like GitHub Actions) cannot log in interactively. Instead, you use a deploy key. It is a secret token that authorizes production deployments.
To get one:
- Open the Convex dashboard
- Select your project
- In the dashboard header, you should see a green “Development (Cloud)” badge. This is actually a dropdown. Click on it and select “Production” to switch to the production deployment.
- Go to Settings → General → Deploy Key
- Click Generate Production Deploy Key
- Give it a name (e.g. “GitHub Actions”) and click Generate Key
- Copy the generated deploy key to your clipboard — you will need it for the next step.
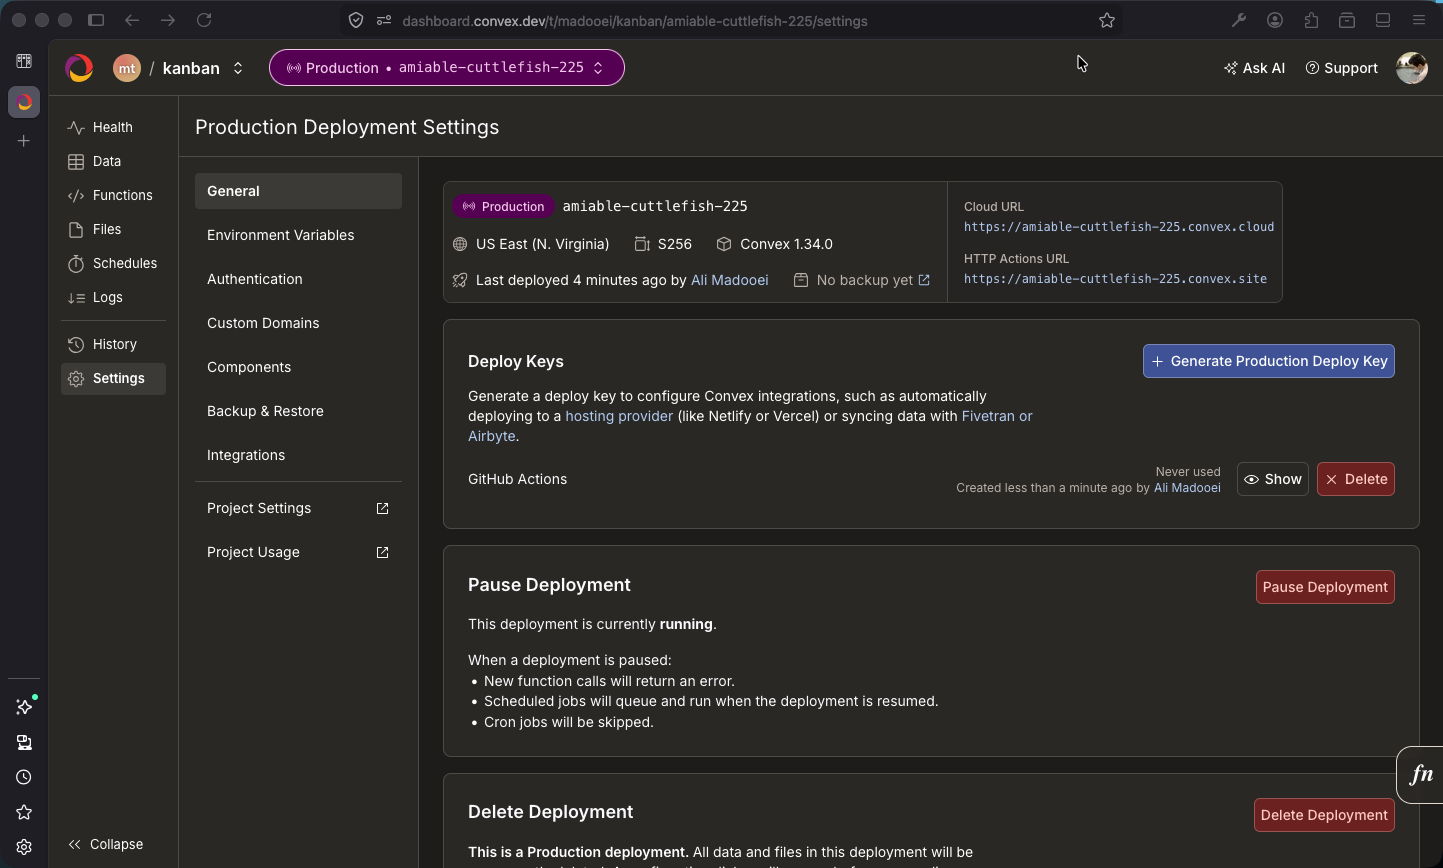
Then add it as a GitHub repository secret:
- Go to your GitHub repository → Settings → Secrets and variables → Actions
- Click New repository secret
- Name:
CONVEX_DEPLOY_KEY - Value: paste the deploy key
- Click Add secret
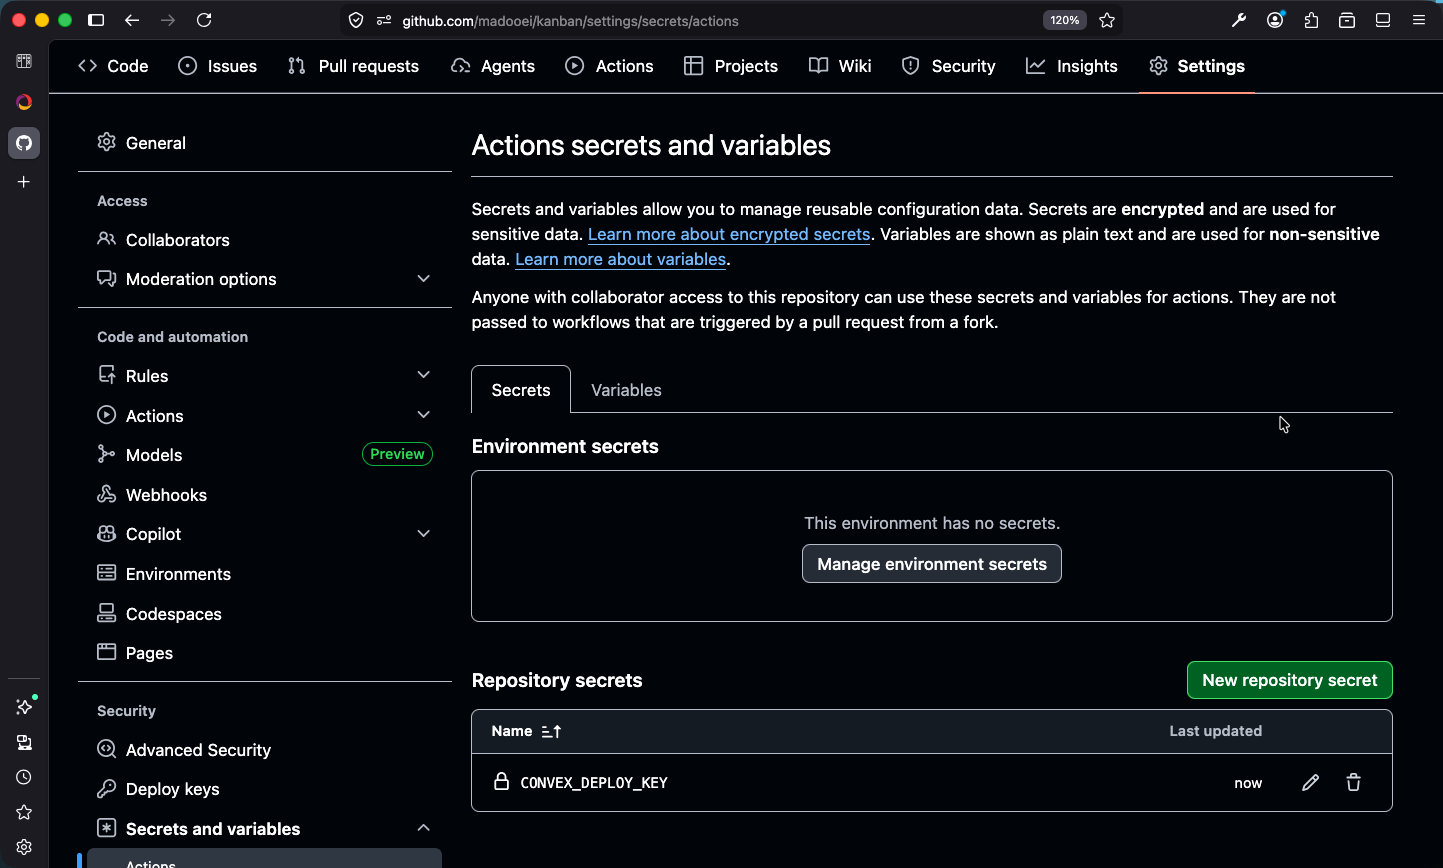
Update the GitHub Actions Workflow
Your repository already has a .github/workflows/deploy.yml that builds the frontend and deploys it to GitHub Pages. But it does not know about Convex. It just runs pnpm run build, which would fail because there is no VITE_CONVEX_URL in the CI environment.
Update the build step to use npx convex deploy --cmd:
- name: Build with Vite
  run: npx convex deploy --cmd 'pnpm run build'
  env:
    CONVEX_DEPLOY_KEY: ${{ secrets.CONVEX_DEPLOY_KEY }}
This replaces the plain pnpm run build step. The CONVEX_DEPLOY_KEY secret authenticates the production deployment, and the --cmd flag ensures the frontend is built with the correct production URL.
The rest of the workflow (uploading the artifact and deploying to GitHub Pages) stays exactly the same.
Checkpoint: Commit your progress.
git add .
git commit -m "kanban-15: Deploy Convex to production with GitHub Actions"
git push
Try It
Once you push to the master branch, go to the Actions tab in GitHub. The workflow will:
- Install dependencies
- Deploy your Convex functions to production
- Build the frontend with the production Convex URL
- Deploy the built site to GitHub Pages
Once it is done, visit your GitHub Pages URL. You should see the kanban board, now backed by the production Convex deployment. Add a task — it is stored in the production database, not your development one.