Set Up a GitHub OAuth App
We told Convex Auth how to talk to GitHub in convex/auth.ts, but GitHub does not know our app exists yet. In this section, we will create a GitHub OAuth App, copy its credentials into Convex, and check that everything is in place. It takes about two minutes. There is no code in this section; we will work in GitHub’s settings UI and in our terminal.
The OAuth Flow
When a user clicks “Sign in with GitHub,” we send them to GitHub with an app ID in the URL. GitHub asks them to authorize our app, then redirects them back to a callback URL on our Convex deployment, which completes the sign-in.
Browser            Convex Auth             GitHub
   │                    │                    │
   │ 1. Sign-in starts  │                    │
   │──────────────────▶ │                    │
   │                    │ 2. Redirect user   │
   │                    │    to GitHub       │
   │                    │──────────────────▶ │
   │                    │                    │
   │                    │                    │ 3. User authorizes app
   │                    │                    │
   │                    │ 4. Redirect user   │
   │                    │    back to callback│
   │                    │ ◀──────────────────│
   │                    │    (/api/auth/callback/github)
   │                    │                    │
   │ 5. Sign-in complete│                    │
   │    and back to app │                    │
   │ ◀──────────────────│                    │
GitHub will only redirect to a URL we have pre-registered, and Convex Auth only knows how to finish the flow if the redirect lands on its built-in /api/auth/callback/github route.
Create the OAuth App
-
Click New OAuth App.
-
Fill in the form:
- Application name:
Issue Tracker Dev(or whatever you like; this is the name that shows up on the GitHub authorization screen) - Homepage URL:
http://localhost:5173/issue-tracker/ - Authorization callback URL: your Convex deployment’s
.convex.siteURL, followed by/api/auth/callback/github. You can find the base URL in your.env.localfile asVITE_CONVEX_SITE_URL. So the full callback URL looks like:
https://<your-deployment-slug>.convex.site/api/auth/callback/github - Application name:
-
Click Register application.
Copy the Credentials
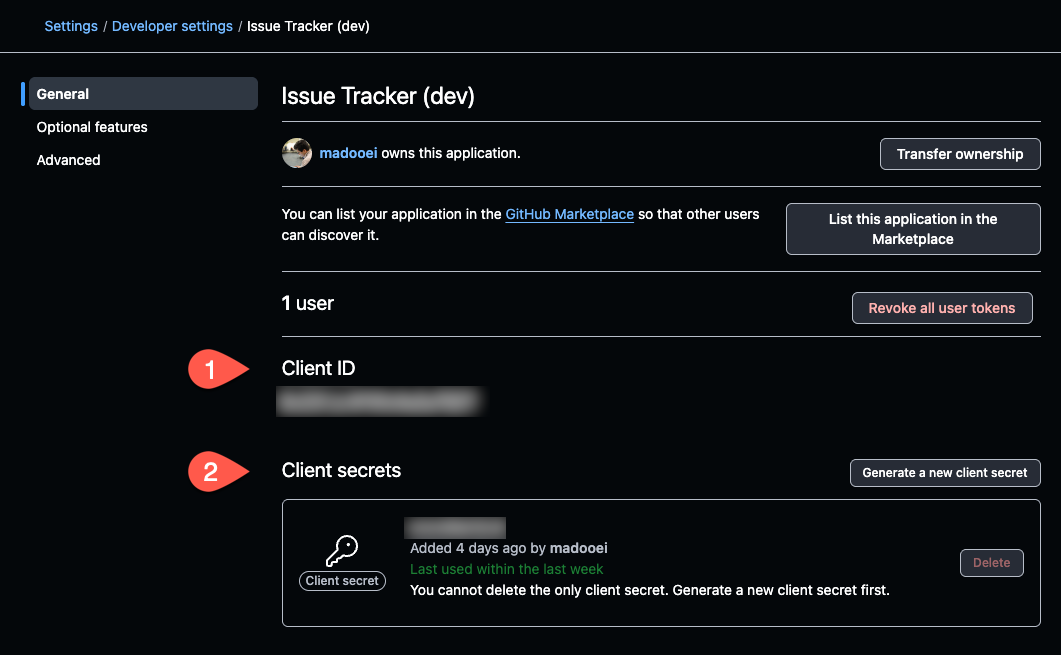
On the OAuth App’s page, you will see a Client ID immediately. Below it, click Generate a new client secret and copy the value that appears.
Store the Credentials on Convex
With npx convex dev running in another terminal, set both values as environment variables on your deployment:
npx convex env set AUTH_GITHUB_ID your-client-id
npx convex env set AUTH_GITHUB_SECRET your-client-secret
The GitHub provider we imported in convex/auth.ts reads AUTH_GITHUB_ID and AUTH_GITHUB_SECRET from the environment. If you name them anything else, the sign-in flow will fail with a confusing error about missing credentials.
Verify Everything Is Set
Run:
npx convex env list
You should see all five of the auth-related variables:
JWT_PRIVATE_KEY— created and set bynpx @convex-dev/authJWKS— created and set bynpx @convex-dev/authSITE_URL— set by us duringnpx @convex-dev/authinitializationAUTH_GITHUB_ID— manually set just nowAUTH_GITHUB_SECRET— manually set just now
That is the full set for development. We will create a separate OAuth App and a separate set of env vars for production later in the chapter.